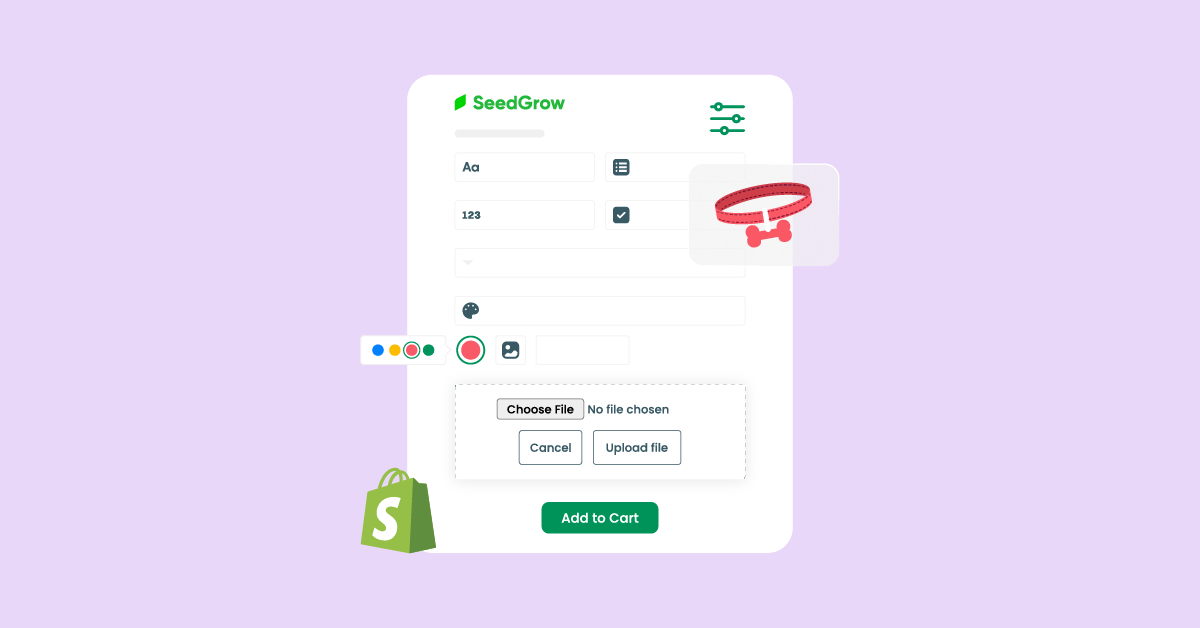
Are you looking to give your customers the power to upload files when they add products to their shopping cart? Perhaps you need this functionality for personalized products on Shopify, or to fulfill an order requiring additional files.
If you’re wondering how to add an upload photo option to your Shopify product page, there are two solutions: editing your theme code or using a Shopify app. While tweaking your theme code can be challenging, utilizing apps is a more user-friendly and sophisticated way to implement personalized options.
In this article, we have a simple guide for using an app to add an upload image button to your Shopify product page. It doesn’t matter your theme or whether you’re a seasoned developer – this app is designed to help. So why wait?
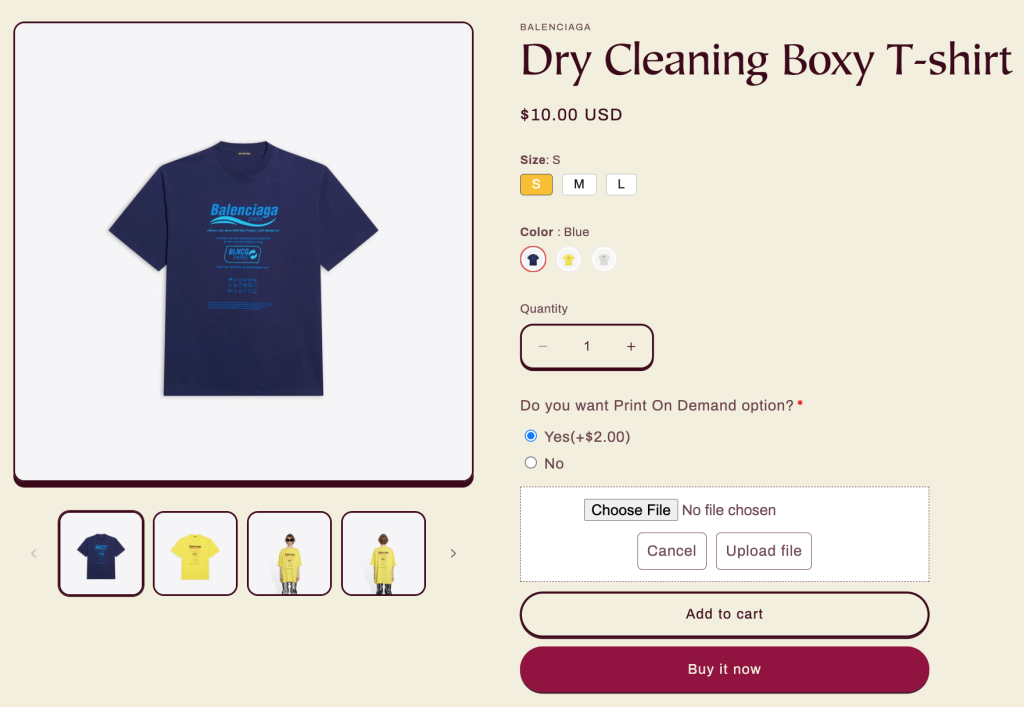
Table of Contents
4 Steps to Add Shopify File Upload on Product Page by Using App
In order to enable file uploads on your Shopify product pages, there are several apps available to help you out. Our team has developed a new app that offers a solution to common issues such as file validations and custom CSS. By installing this app, you won’t need to make any theme modifications to your website.
We understand that you may be interested in building your own file upload feature, which we will show you how to do. However, if you’re looking for a more advanced and customizable option, we recommend using our app called EXPO – Extra Product Options. This app is not only cost-effective, but also provides a beautiful widget with numerous customization options.

To add the file upload feature to Shopify product page with EXPO, we’ve outlined four simple steps below which include:
- Create an option set
- Add File Upload option to that option set & format it.
- Link File Upload option with any conditional logic (if required)
- Preview & Save changes.
You can take a look at how it works:
And now it’s time for the step-by-step tutorials so that you can start real quick.
Step 1: Create New Option Set
To add a file upload feature to your Shopify product page, you need to create a new option set that includes the “File Upload” option type, or edit an existing option set. Here are the steps you need to follow:
After activating EXPO, go to the “Option Sets” tab in EXPO, where you can manage all the configured option sets for your products.
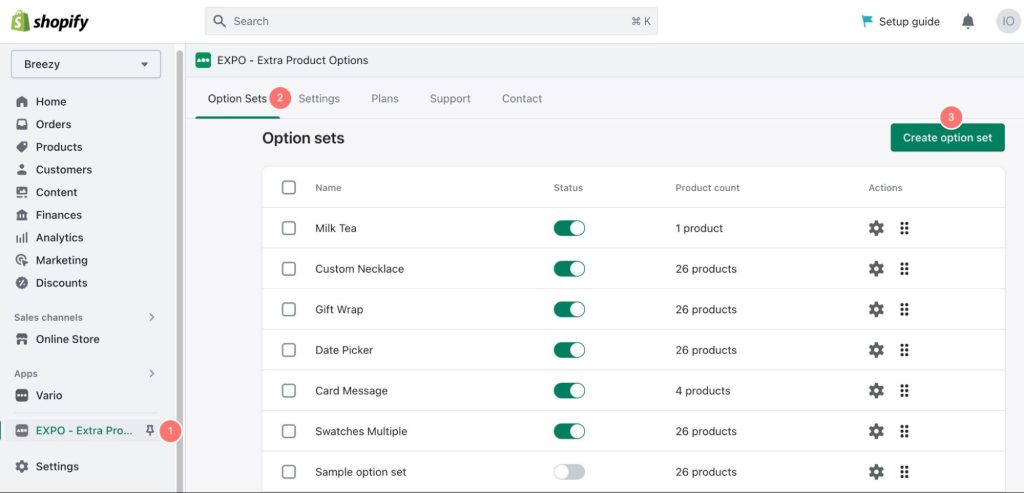
To create a new option set, click on the “Create option set” button.
Once you have clicked on this button, you will be taken to the a Sample option set configuration page where you can begin configuring your new option set.
Step 2: Add File Upload Option
To add a file upload option, please follow these steps:
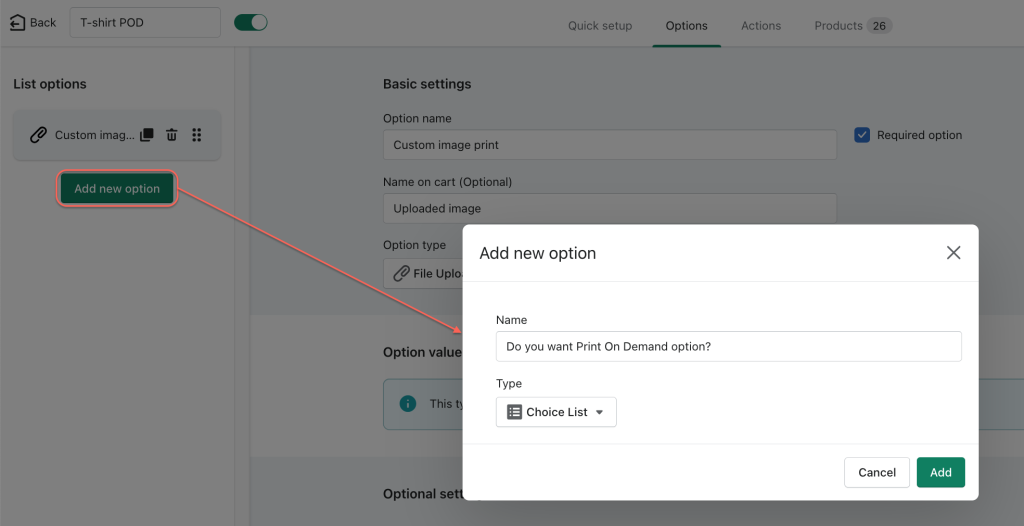
1. Add New Option
First, click on the “Sample option” on the left screen to edit it.
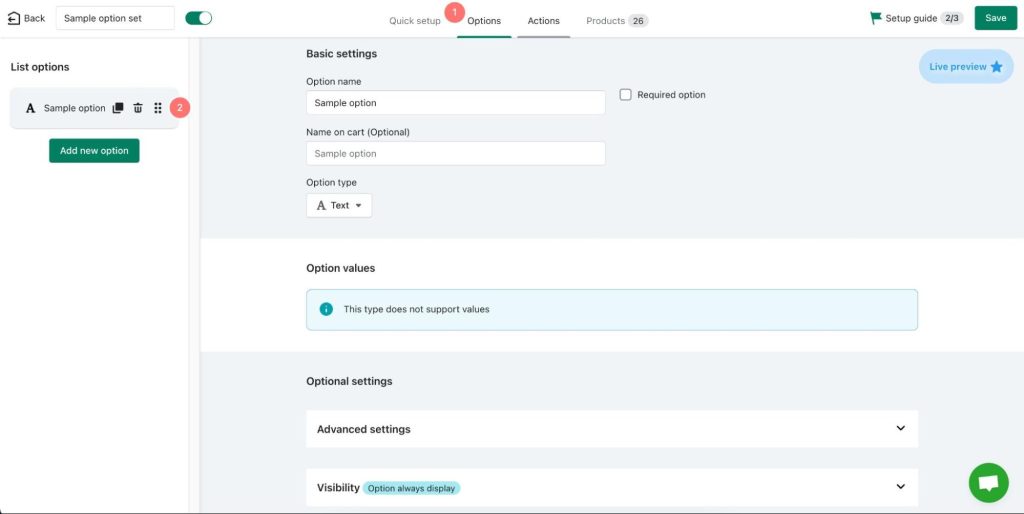
In the Basic settings, first give the option a name. Then, tick the checkbox if this a required option.
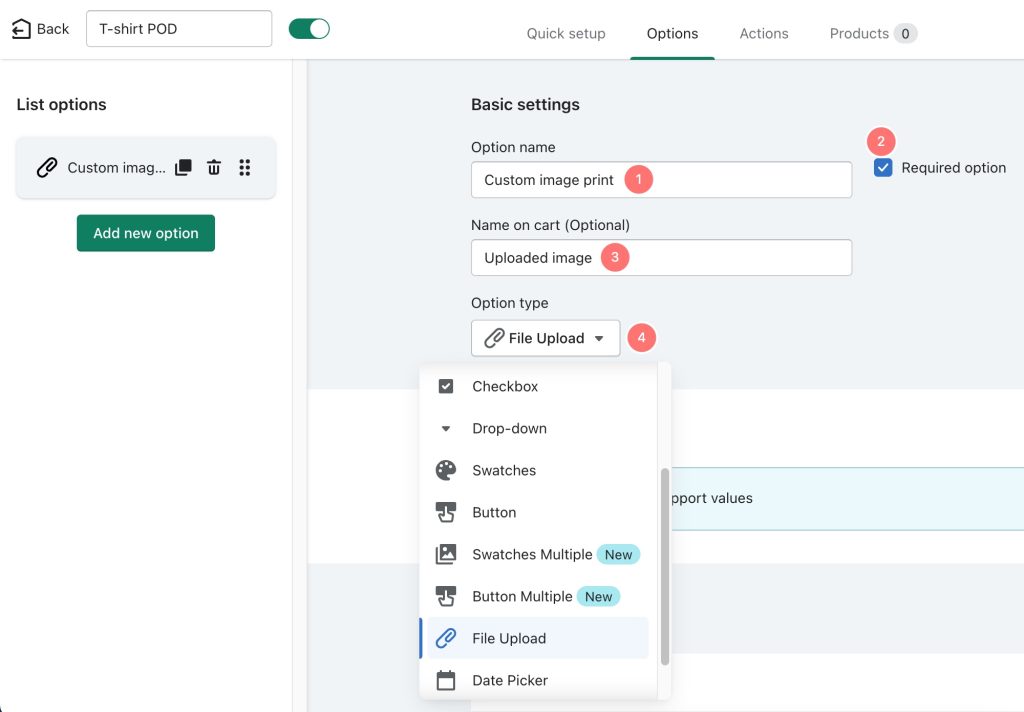
Third, add a name for the option that will be displayed in the shopping cart. This is an optional field.
Finally, select “File Upload” from the dropdown menu for option type.
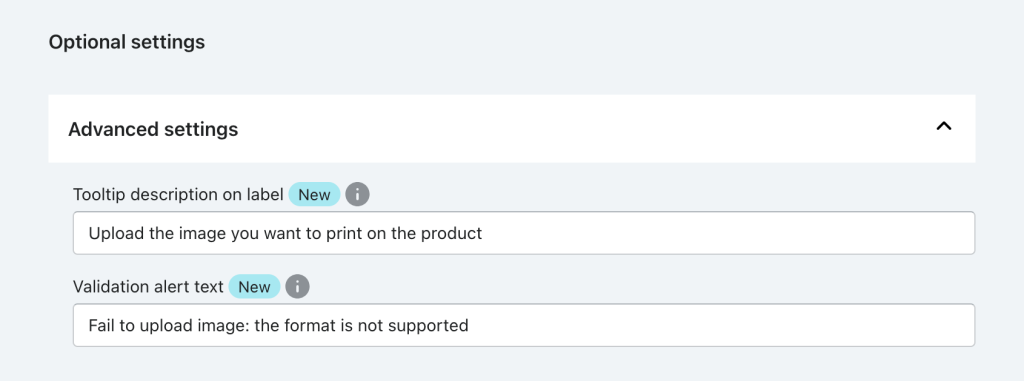
3. Advanced Settings
If desired, you can customize other settings for the option in the Advanced settings.
You can include a tooltip description on the label and a validation alert text.
4. Assign Products
To assign products, there are three options available:
1. All Products: This option will assign the option set to all the products in your inventory.
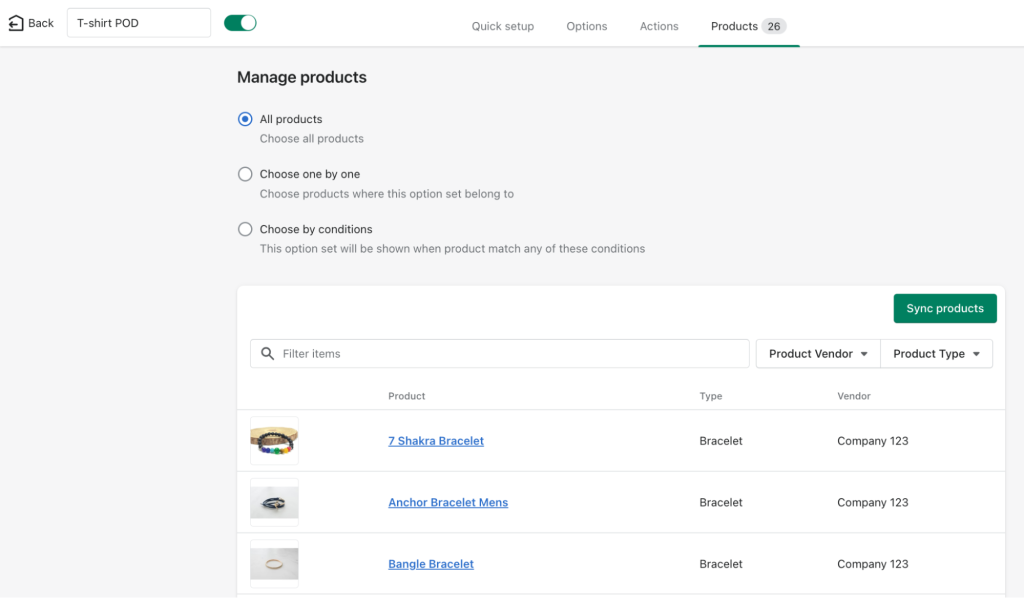
2. Choose one by one: This option allows you to manually select each product that you want to assign the option set to.
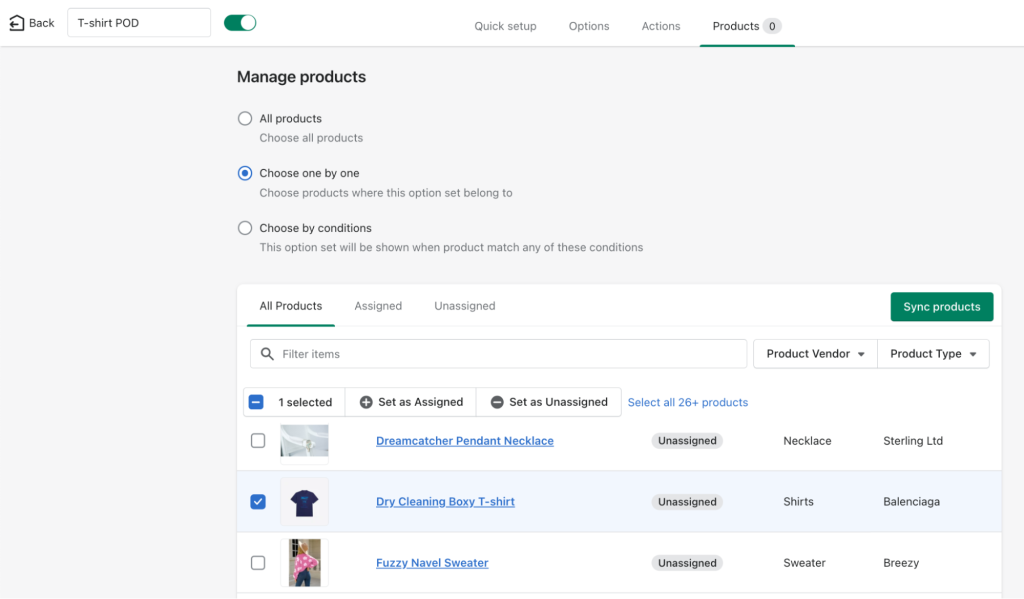
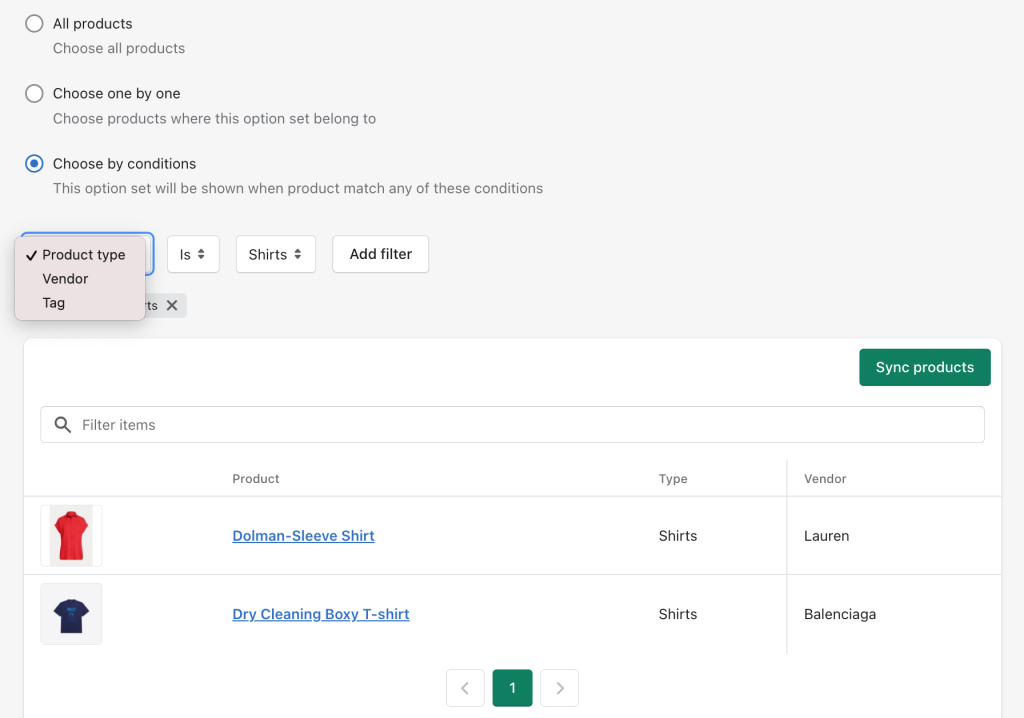
3. Choose by conditions: This option will only show the option set for products that meet certain conditions. You can filter by product type, vendor, and tag to ensure the option set is applied to the right products.
Click Save and you have done enough for this step.
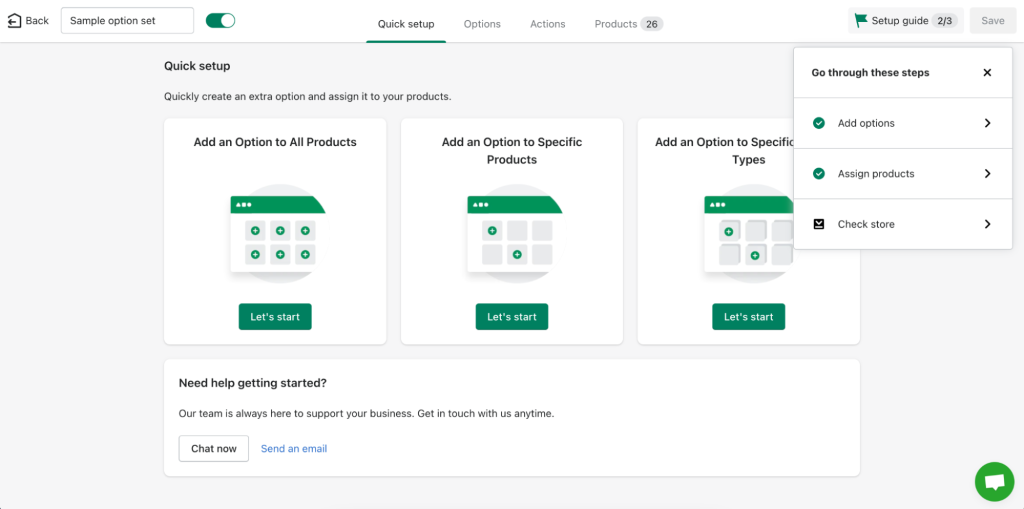
Another way to configure the file upload option for types of as fast, you can follow these steps. Firstly, head to the Quick Setup tab and click on the “Let’s Start” button in one of three options:
- Add an Option to All Products,
- Add an Option to Specific Products, and
- Add an Option to Specific Product Types.
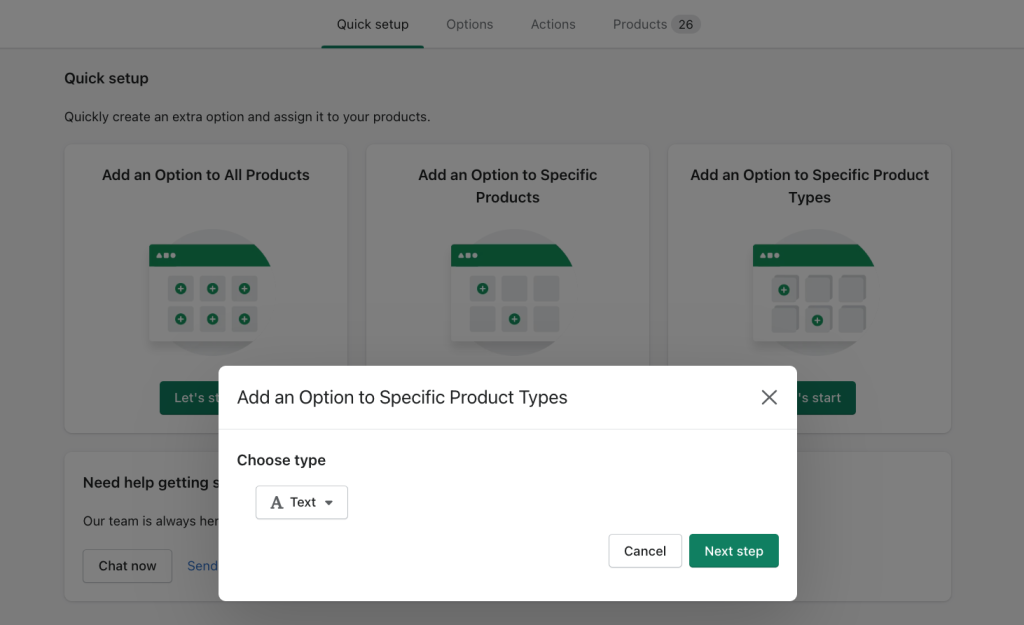
Choose the appropriate option and follow the instructions provided. You will need to enter the name of the option, select File Upload as the option type, and assign it to the relevant products.
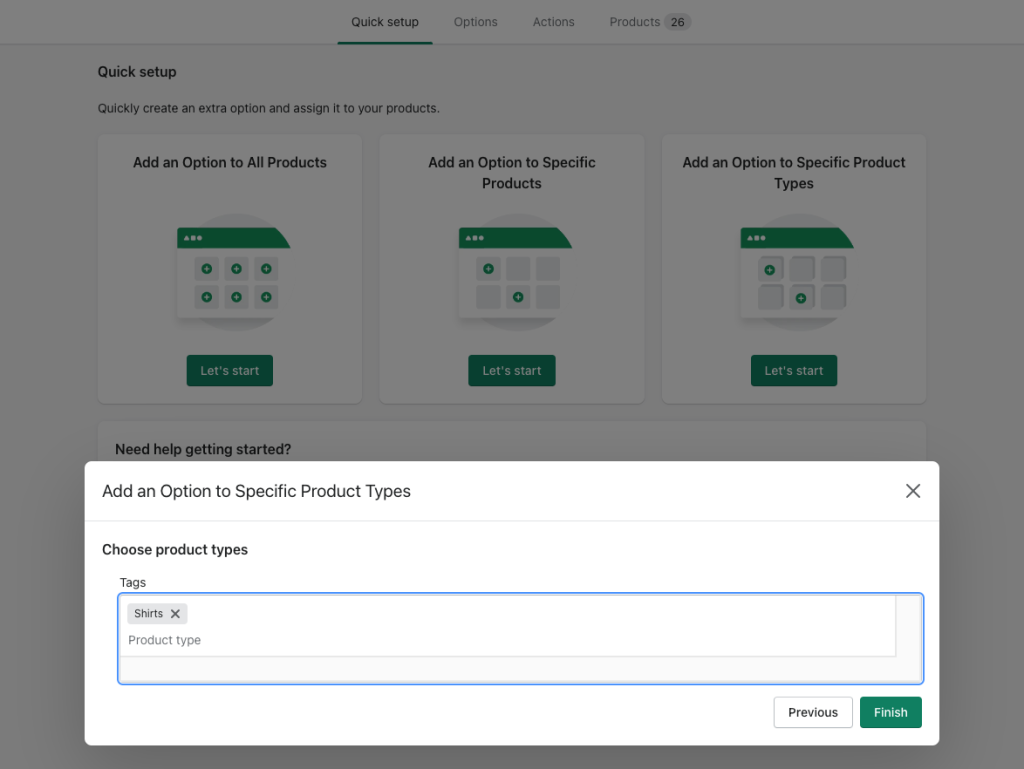
By following these steps, you can easily configure the file upload option for types as fast.
Step 3: Add Conditions to Display File Upload Field (OPTIONAL)
This step is optional, and if no conditions are added, the file upload option will always be visible on the product page.
In the scenario where the option set has only one option which is file upload, this option will always be displayed.
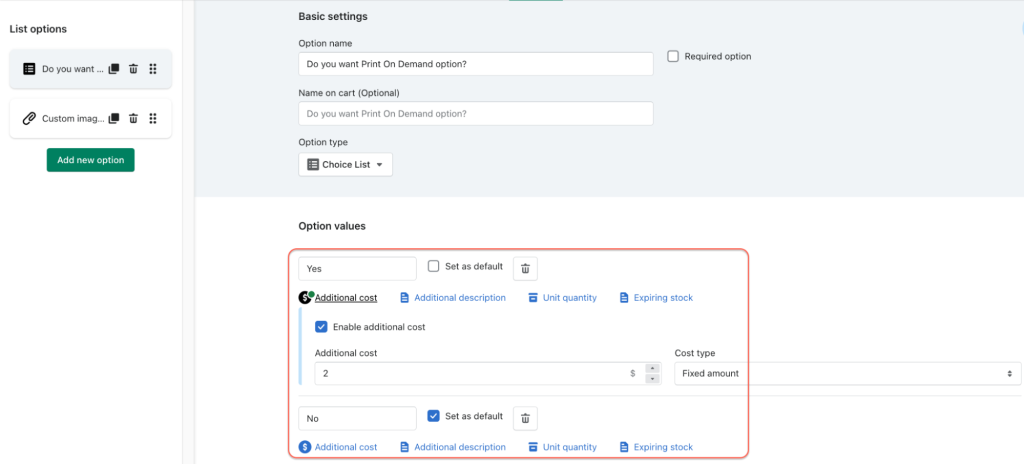
However, if you want it to appear only after customers make a specific choice, you need to create an option that corresponds to that choice.
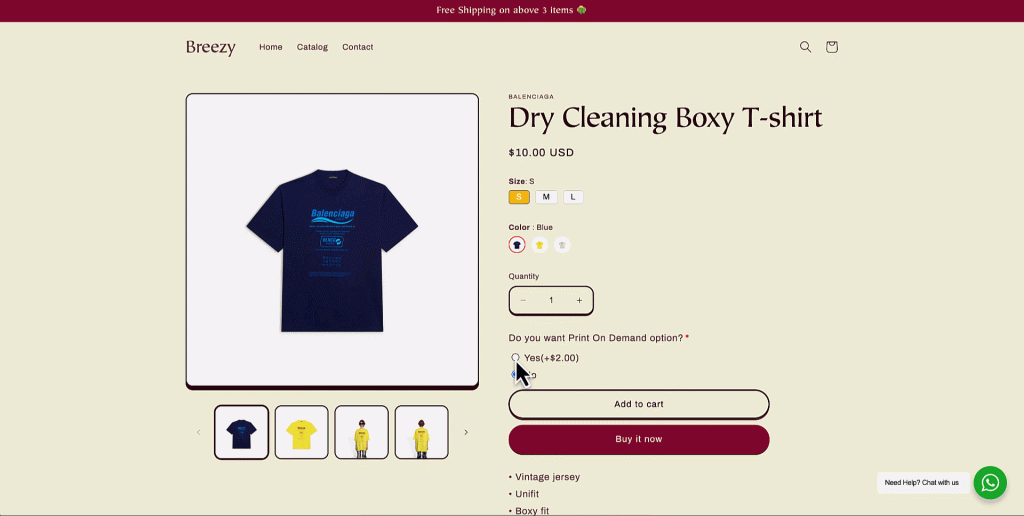
For instance, you can add a Choice List option to ask customers if they want the Print On Demand option. In the option value, you can add $2 for the Yes option.
Now, go back to the File Upload option configuration. Under Visibility, click “Add Logic“.
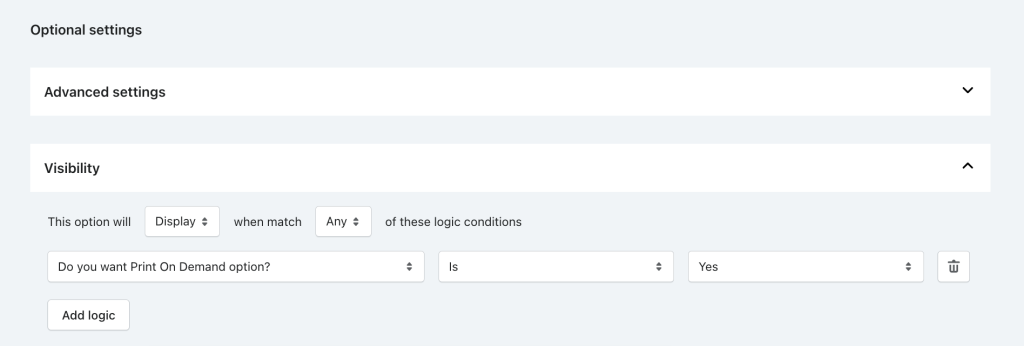
Choose Display or Hide the option when it matches All or Any of these logic conditions.
Then choose the option with its option value that trigger the display of File Upload option.
Step 4: Preview & Save Changes
In order to ensure that the changes made in the options settings have been successfully implemented on your product page, it is recommended to preview them first.
To do so, click on the “Live Preview” button to see a demo of your page with the updated settings.
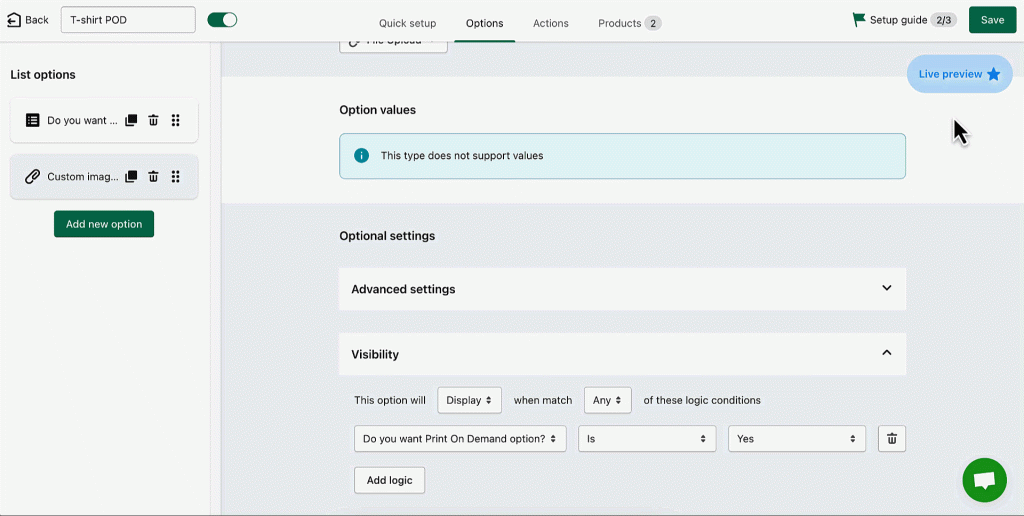
Once you are satisfied with the changes, Save them and proceed to the front-end of your website to test them out in action. This step will help you to ensure that your product page reflects the changes you have made to the options settings.
You are right, it’s done. Now your customer can easily upload file on your Shopify product page.
Want to add WhatsApp Chat widget to your Shopify store in just one click? Check out on SeedGrow WhatsApp Chat Widget.
Why Choose EXPO to Add Any Extra Options for Your Product Page?
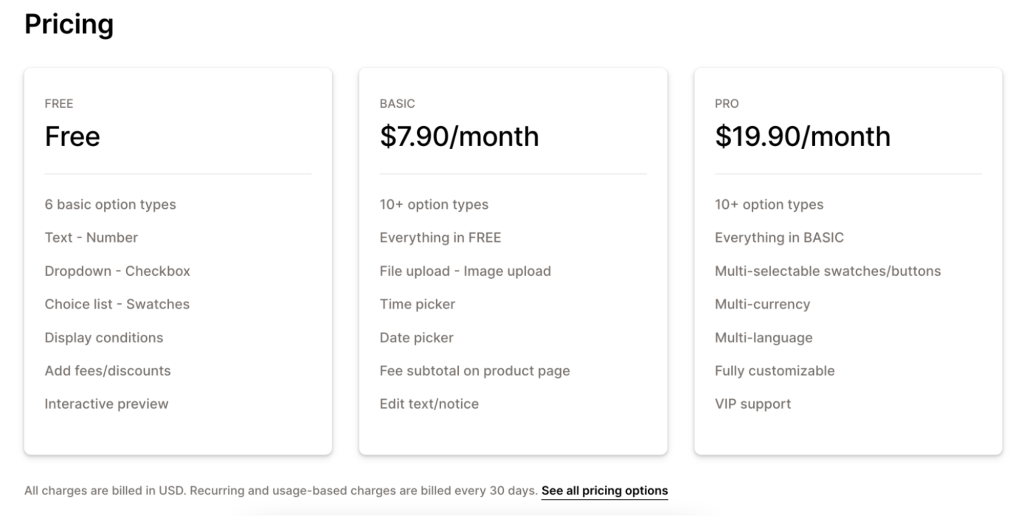
The File Upload feature is exclusively available in EXPO – Extra Product Options Pro. However, the free plan offers a range of basic yet popular options such as Text, Number, Dropdown, Checkbox, Choice list, and Swatches.
The Pro plan includes advanced options to meet various requirements, including Time Picker, Date Picker, Swatches Multiple, Button Multiple, Text Area, File Upload, and so much more.
This tool is one of the most cost-effective apps on Shopify, with flexible plans starting at just $7.90 per month.
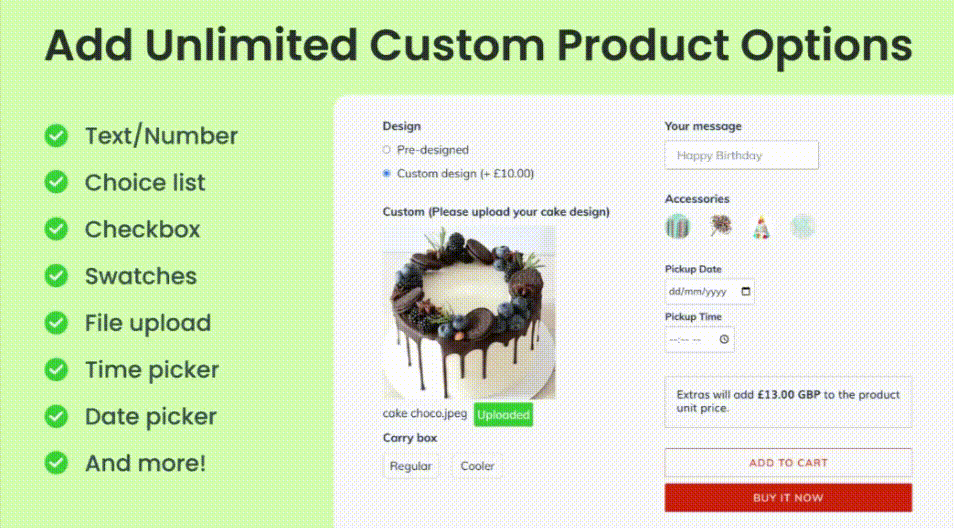
The app provides an array of features, including:
- Unlimited options and custom fields, facilitating customers to personalize their products.
- Automatic expansion of next options upon selection of a particular option by the customer.
- Provision to add extra fees and discounts based on selected products and conditions.
- Ability to assign the entire option set to a group of products or hand-picked products.
You can also check out a Free Shopify App – Vario ‑ Variation Swatches where you can ultimately design any variant options with style, border, tooltip, hover, zoom effects, and so much more to impress your customers.
Add Shopify File Upload Button to Product Page by Editing Theme Code
This method allows you to add an upload image button to your Shopify product page without the need for an app. If you are not familiar with coding, we advise against attempting to edit your theme code yourself.
However, experienced developers can benefit from this method in several ways:
1. It enables easy control over site performance, such as site loading speed, response time, renders time, and more.
2. It’s a fast and free way to edit your online store’s themes. The process typically involves four main steps: creating a new custom product template in your Shopify theme, coding a custom section to add an upload photo button, applying the new template to a product, and managing (showing/hiding/…) customization information in the checkout, cart
It’s important to note that editing a Shopify theme may be difficult and time-consuming for sellers who are not familiar with coding. While instructions for theme customization can be found online, they tend to be specific to certain themes and may not be suitable for everyone’s needs.
There is also a risk of errors or bugs that could affect the buying process. To avoid these issues, it is recommended that sellers either hire a skilled developer or utilize an app with support.
It’s also worth noting that Shopify theme customization may not be the best option for products with multiple personalization options, as the more customization options there are, the more complex the code becomes.
In short, it’s advisable to avoid editing a Shopify theme if you’re not proficient in coding.
FAQ about Shopify File Upload
1. How do I add an upload button to my Shopify product page?
To enable your customers to upload files on your Shopify product page, you can use EXPO – Extra Product Options. Simply follow these steps: include the File Upload option in an option set, customize its formatting according to your preferences, and link it with conditional logic if required.
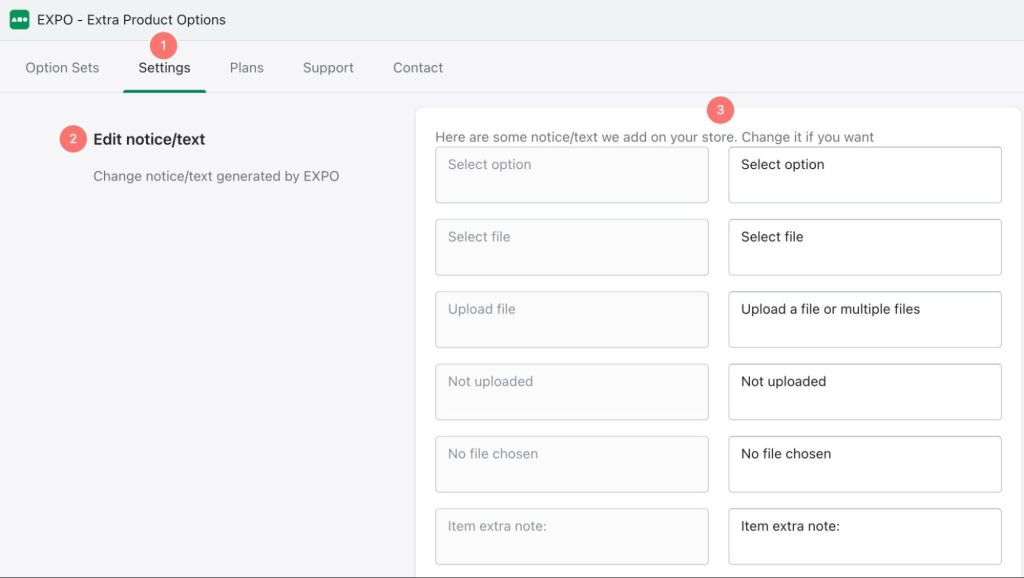
2. Can I change the text notification of the Shopify File Upload field?
If you’re looking to modify the text notification of the Shopify file upload field, it can be done fairly easily. Access the Settings tab of EXPO and navigate to the Edit notice/text section. From there, you can enter the text you wish to use as an alternative to the default message.
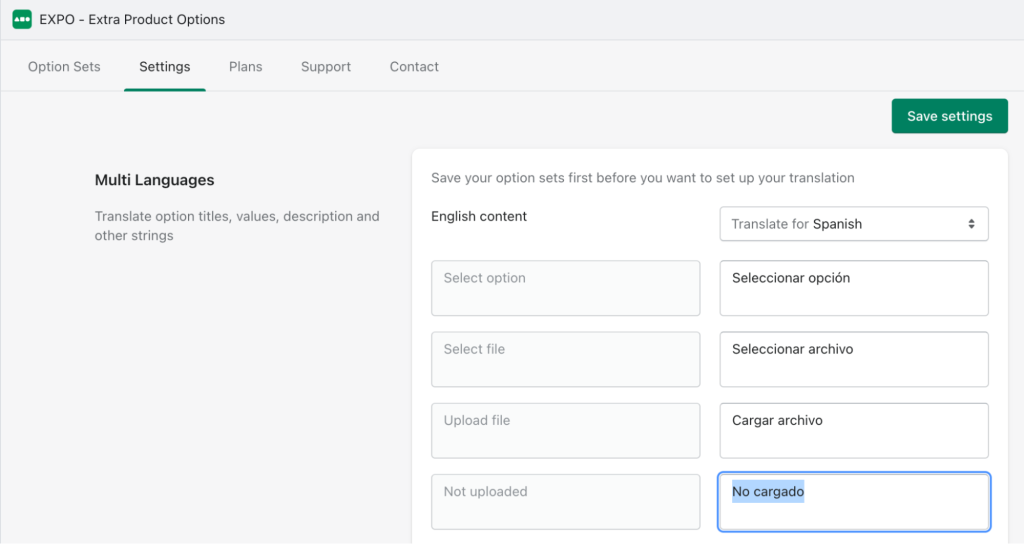
3. Can I translate the Shopify File Upload field into multiple languages?
It is possible to translate the Shopify File Upload field into multiple languages. To do this, go to the Multi Languages section of the EXPO Settings tab and add the text in each language you want. This includes option titles, values, descriptions, and other strings.
Conclusion
To sum up, adding an upload file option to your Shopify product page is a great way to enhance your customer’s shopping experience by customizing the item they love.
While editing theme code may seem daunting, using an app like EXPO can simplify the process and provide a customizable solution.
This cost-effective app offers a variety of features and a beautiful widget, making it an excellent choice for any Shopify merchant looking to add this useful feature to their online store. So why not give it a try and see how it can transform your Shopify store today?